
This post may contain affiliate links. If you use them we earn a small commission at no extra cost to you.
The floor of your van is going to serve as the foundation for everything else, so it’s important to start with a stable, waterproof, and level surface. No matter what material you end up choosing for a finished floor, you’ll need to use proper insulation and quality building products for what’s underneath.
We’re going to take things step by step in this guide and share exactly how we installed our floor, with some thoughts on alternative options.
The first, and most important step in the process, is to prep the metal floor of your van. If you haven’t already seen our guide on how to prep your van, take a step back and read it.
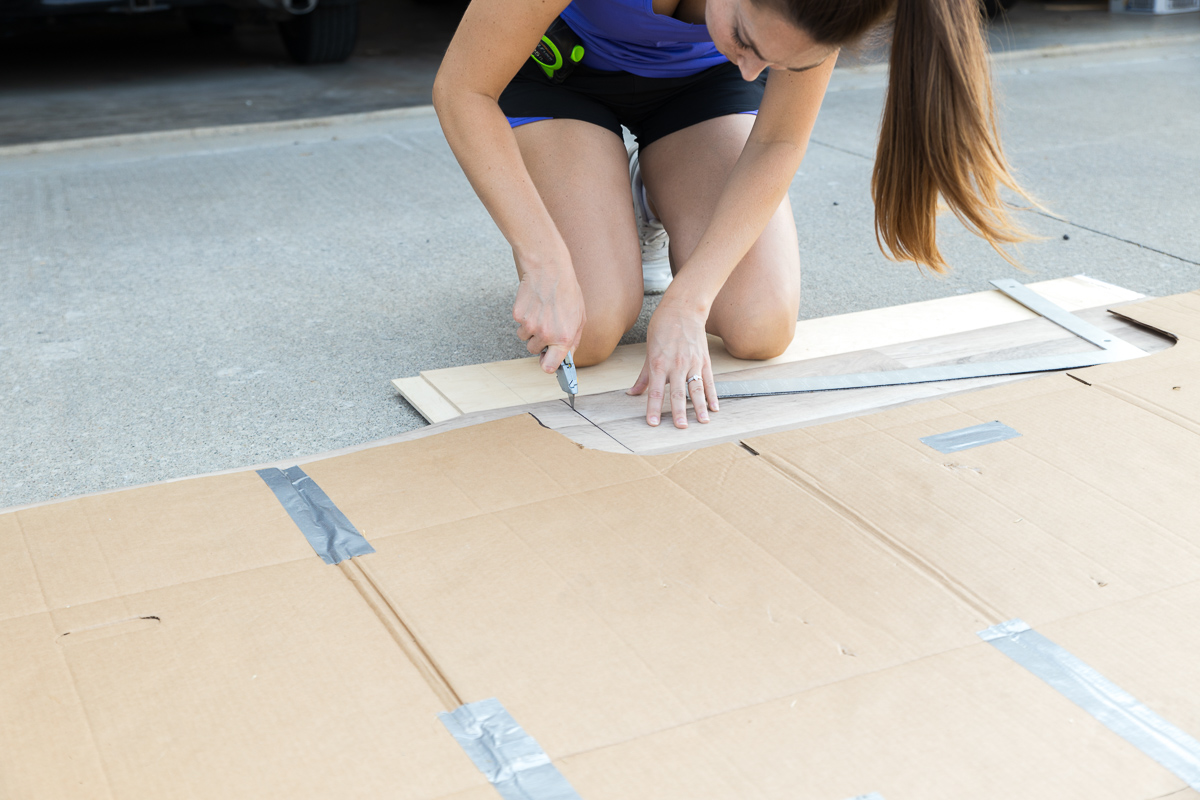
We left off in that guide with a floor template.
A factory floor mat makes a great template for tracing out every layer of your floor. If your van doesn’t have one, collect some large pieces of cardboard. Lay the cardboard down inside the van, scribe around the perimeter, then attach the pieces together, until you have one big template.
Insulation
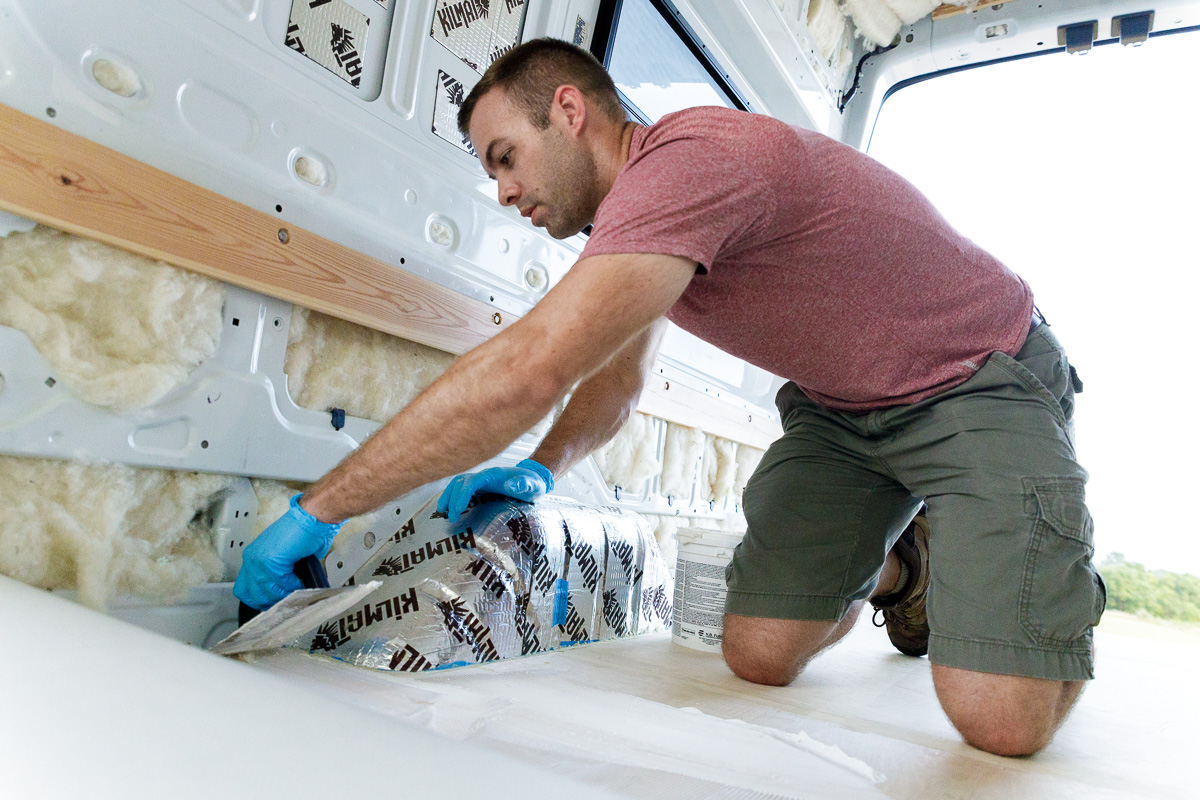
Whether you’re chasing sunny weather and beach vibes or spending all winter hitting the slopes, you’re going to want insulation beneath your finished floor.
The metal floor in vans is relatively thin and will easily allow cold to pass through. No insulation or limited insulation just means higher heating costs and inefficiency, not to mention an uncomfortable floor if it does get cold.
Adequate insulation also provides some degree of sound dampening, which is especially helpful to prevent road noise through the floor.
The method we’re going to recommend is the same whether you plan on spending time in cold environments or not. You could save yourself a small amount of head room by using thinner materials. However, that half an inch probably isn’t worth worrying about, and the costs of using the 1” XPS foam board will likely be cheaper anyway.
Filling corrugations
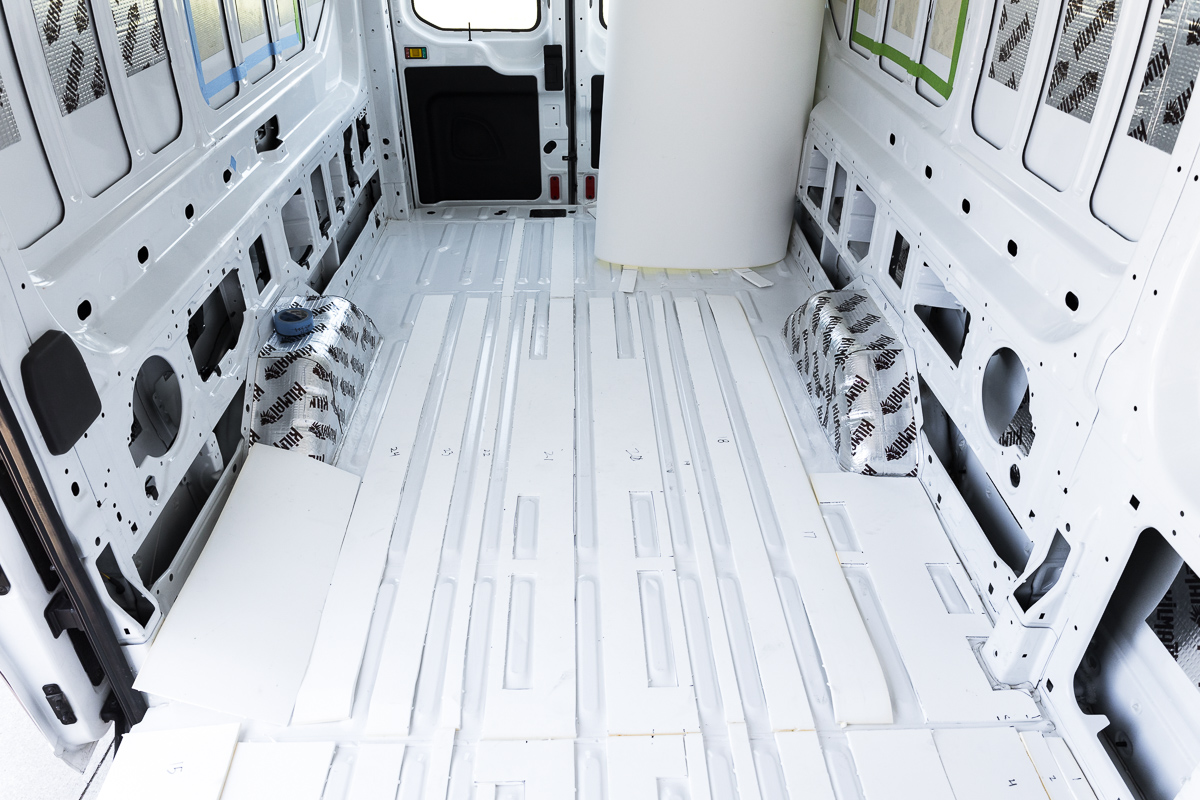
The first step is going to be filling those low spots or corrugations in your van’s metal floor. You should have already prepped the floor so that there’s absolutely no chance of rust developing.
One simple way of doing this is with sheets of minicell foam. Depending on your model of van, purchase the 1/4” or 3/8” thick minicell, cut it into strips and adhere it to the floor using a spray on adhesive, such as 3M 90 or Loctite High Performance.
There’s an alternative product on the market called Bedrug. We haven’t tried it so we can’t vouch for it, but it does look interesting. Essentially it’s a plastic floor mat with foam backing that fits your specific vehicle model. The foam fills the corrugations and gives you a flat, durable surface.
It’s a bit spendy, but the advantage would be in the time savings. Cutting out each individual piece of minicell foam and gluing them down is a tedious process. Also, you’d have a custom fit floor template for cutting out the rest of your insulation and subfloor.
One seemingly popular method we’d caution against is using wood furring strips to fill the corrugations and then attach your subfloor. It may seem like a good idea and it’s certainly going to save money. The problem is that wood creates what are called ‘thermal bridges’. Because the wood will transfer the heat or cold better than the insulation, you’re basically creating a path for the cold from your metal floor, through the wood and into your finished floor. You need a solid layer of insulation between the metal and your finished floor.
That brings us to the next step.
Main layer of insulation
The most straightforward method here is a solid layer of foam insulation. We used 1” thick XPS foam. It comes in a few strength varieties, typically called ‘150’, ‘250’, etc. The difference being how much pressure it can handle without cracking.
Since weight will be distributed across it when you’re done, you shouldn’t need to worry about buying higher strength. In our experience it’s difficult to even find the 250 variety in stores, so just buy what’s available and be very careful about walking on it or putting too much pressure in one place when you’re installing it.
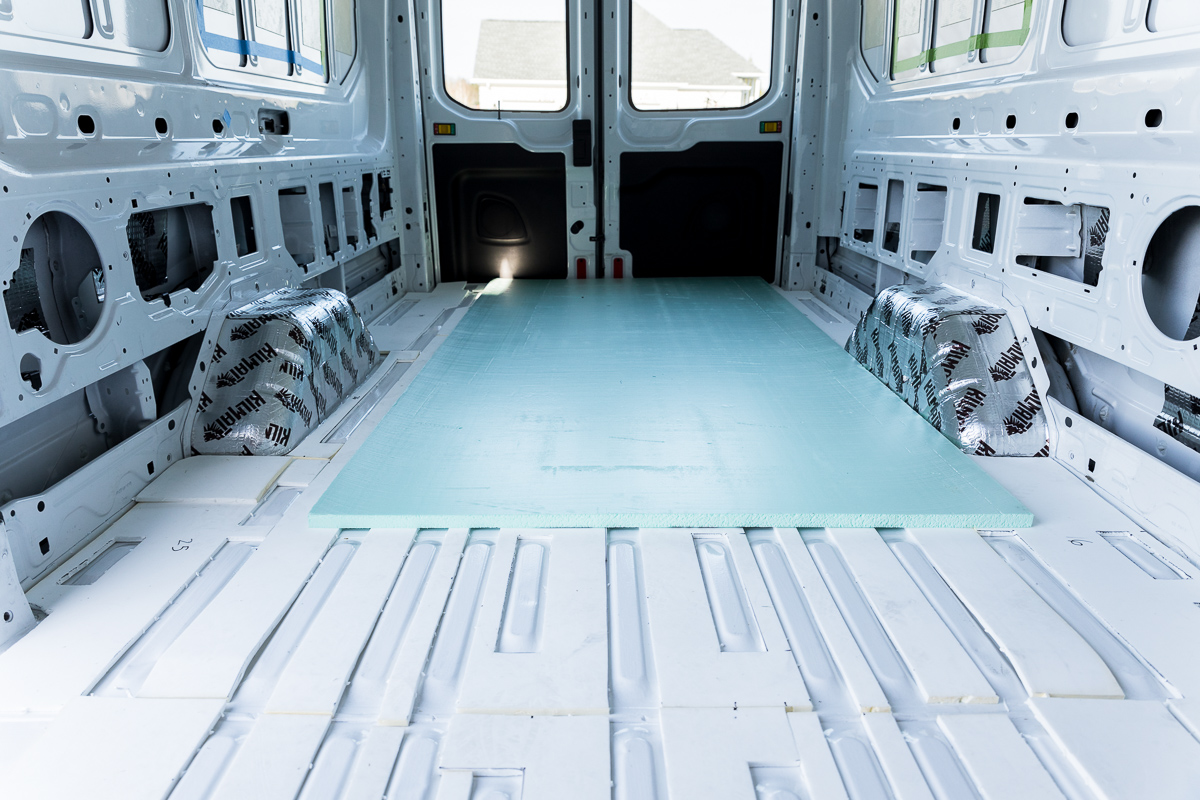
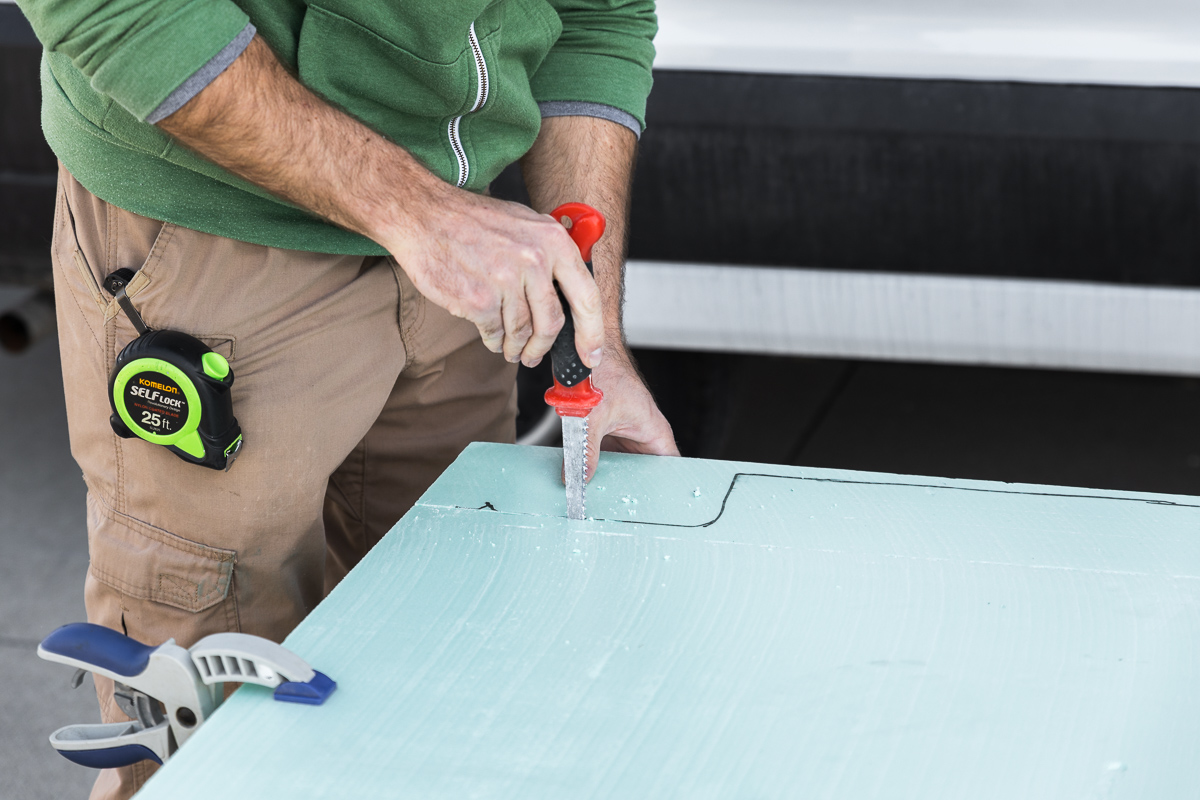
This is where your floor template will come in handy. Lay your XPS foam board down on a flat surface, place the template on top, and trace around it.
Another approach is to lay the XPS down inside the van and use a scribing method to trace the perimeter of the van onto the foam. You can use a wooden dowel and a sharpie to get a pretty accurate scribe. Trust us, you’re going to need to perfect your scribing technique during this build anyway.

Once you have your lines drawn, cut the XPS foam. We recommend a drywall knife, which easily cuts through without leaving too jagged of an edge. No matter how you cut it, be aware of the tiny pieces of foam that will be breaking off. Have someone follow you with a shop vac if possible and wear a respirator or filtered face mask for all those little particles that you can’t even see.
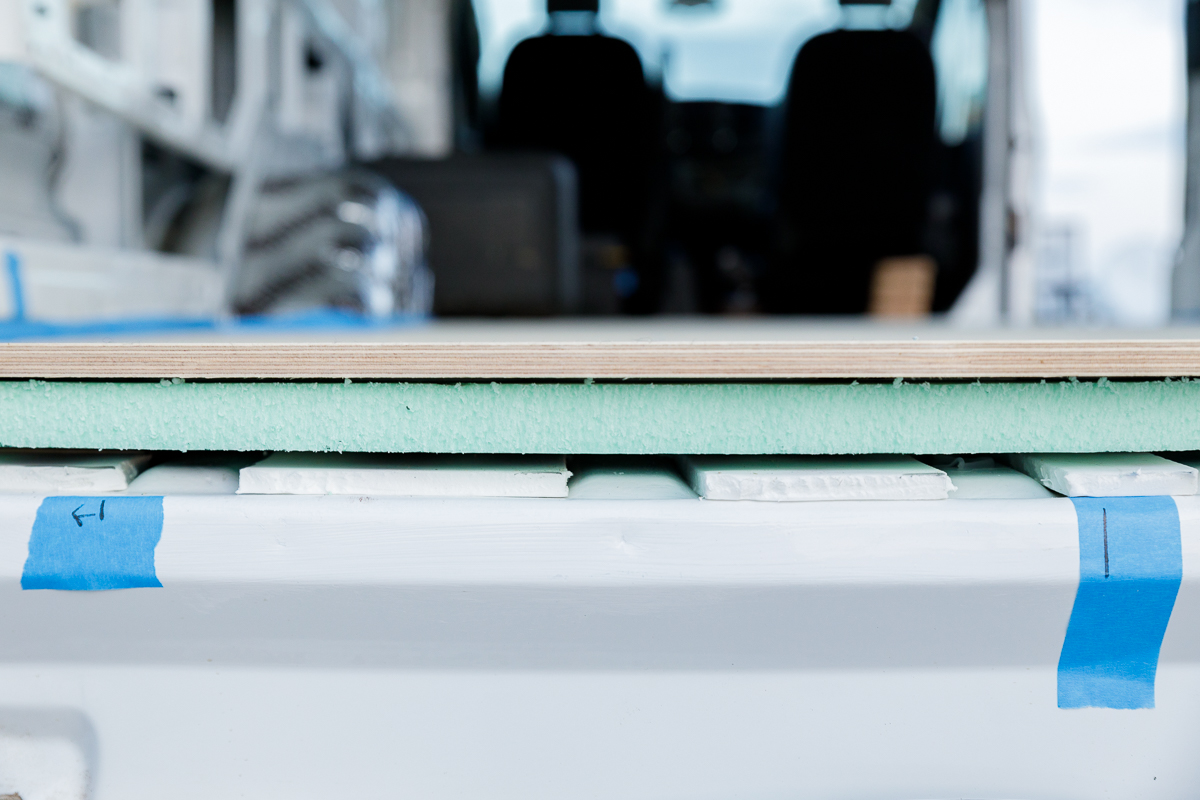
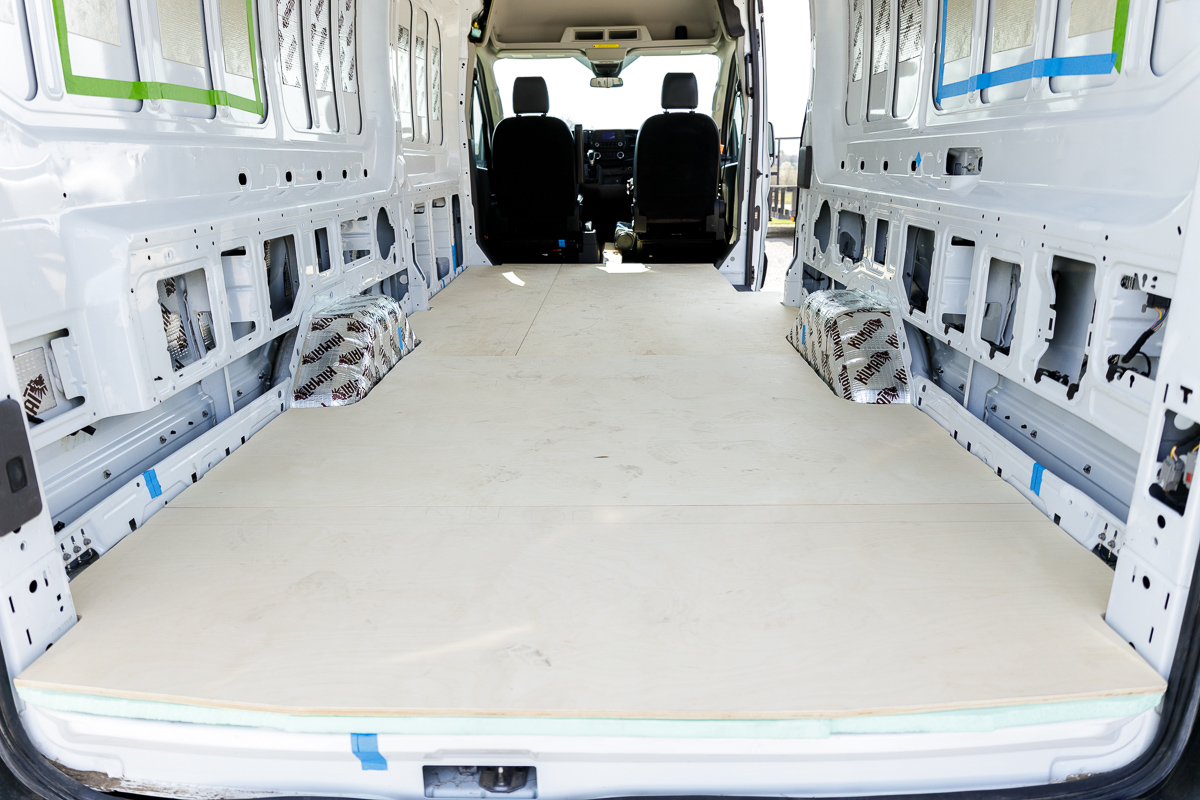
Leave a slight gap around the entire perimeter of the floor, about a 1/2”, to prevent the XPS from rubbing against metal and squeaking. Your pieces should go in sort of like a puzzle, resting on the metal floor and minicell foam, but free floating.
Subfloor
Now we come to the solid foundation part of your finished floor. The only proper approach here is with quality plywood.
The cheapest option is the exterior builder grade plywood you’ll find at all the big box stores. In our experience that plywood is almost unusable. It’s cheaply made, with extremely thin layers of veneer and low quality cores. It warps easily and can be filled with voids that you’ll spend hours filling and sanding to get a smooth surface.
That being said, we’d strongly recommend leaving some room in your van build budget for some quality plywood, such as Baltic Birch. It has become extremely expensive in recent years and harder to come by, but it’s much higher quality, with thicker, solid layers of actual birch. The veneer is also smooth and free of voids. Most importantly, it’s not going to warp on you and cause problems with your floor. We chose 1/2” Baltic Birch for all the important components throughout our build, but this was before the prices skyrocketed.
Another option is marine grade plywood. It’s made specifically for damp environments, with waterproof glue and is sometimes pressure treated or even sealed against moisture.
Just like before, use a template to trace the outline of your floor onto the plywood. Make your cuts with a jigsaw and fit them into the van, once again leaving a 1/2” gap around the perimeter.
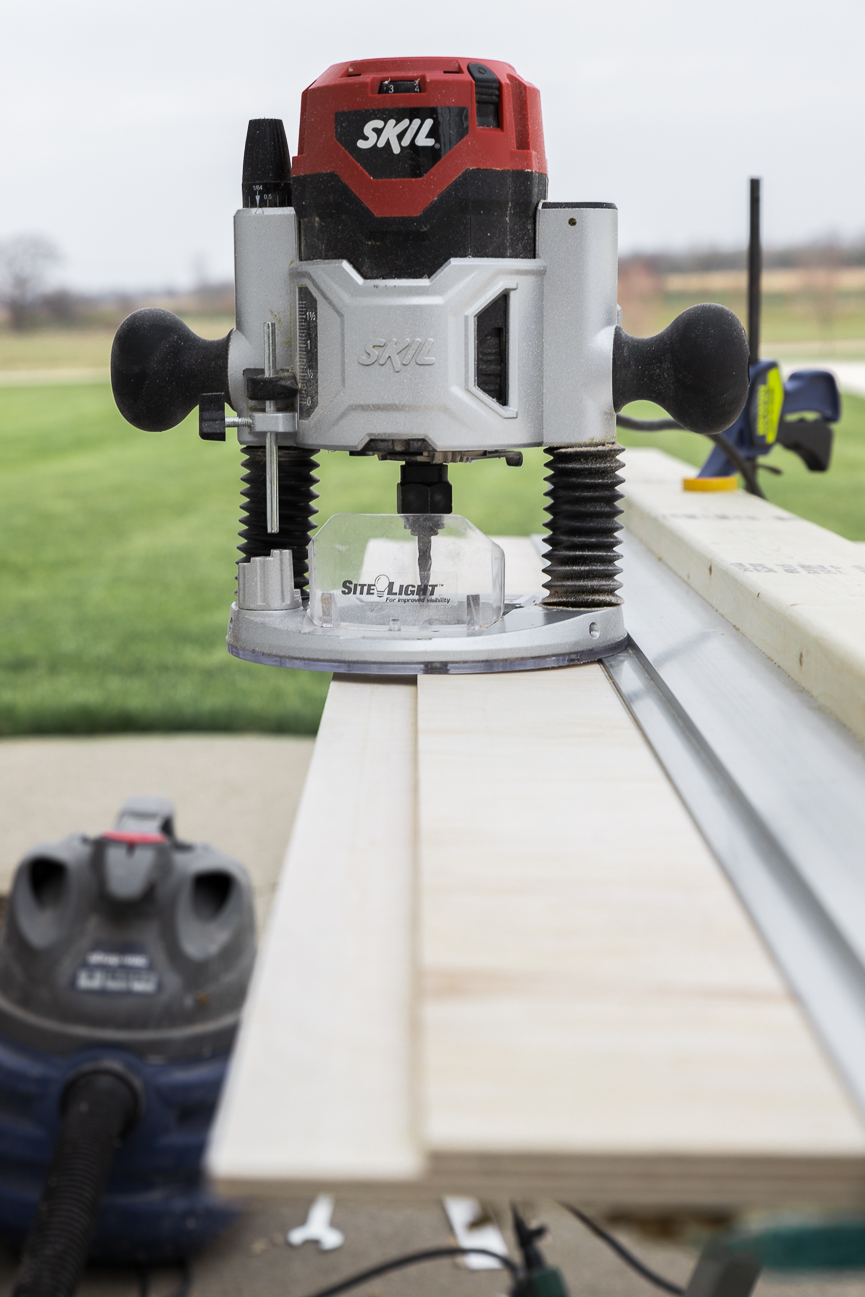
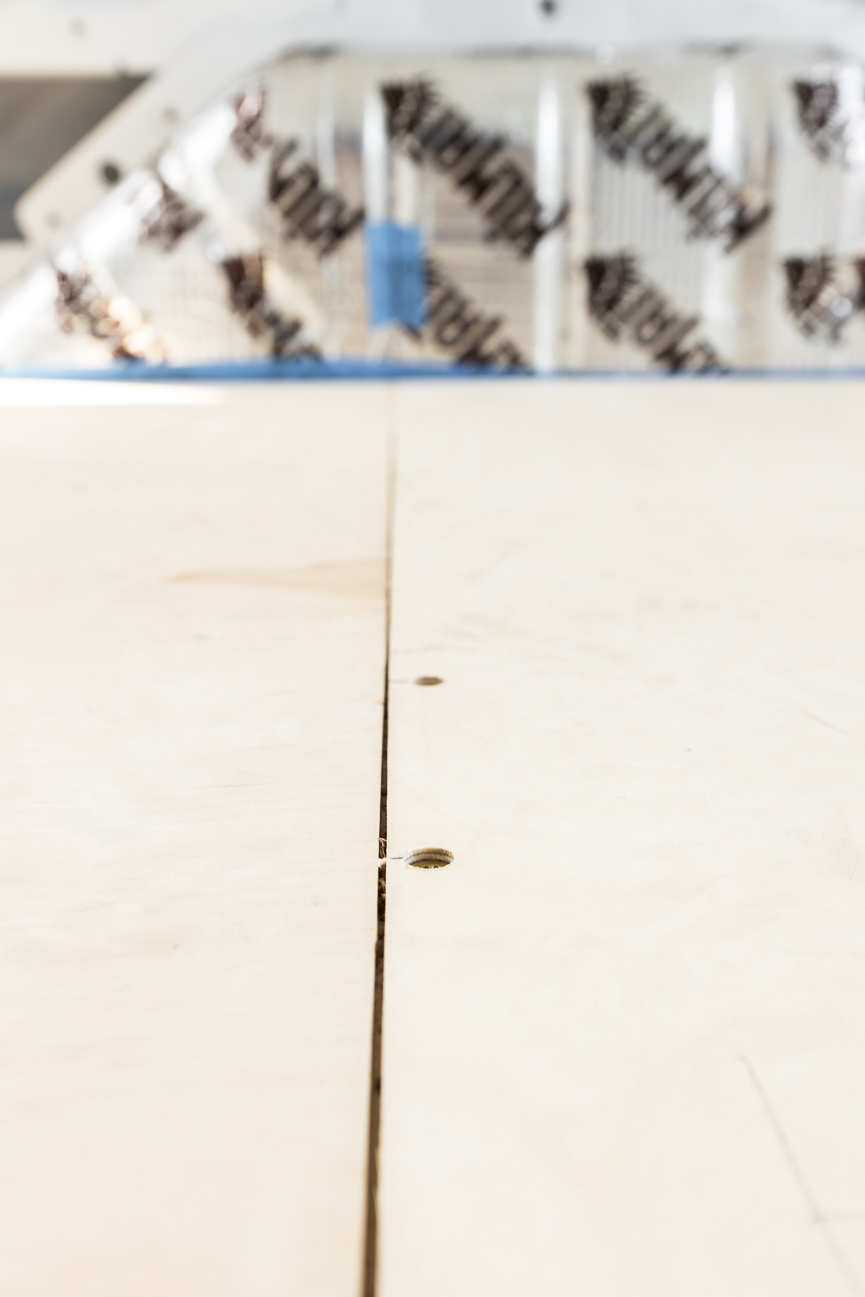
To go an extra step ensuring your floor is flat you can use a half lap joint between pieces of plywood. This prevents the two pieces from becoming uneven in the future, which can happen from warping or the movement of the van over time.
With a router, make a ‘rabbit’ cut halfway through the entire edge of one piece. Then, repeat the process on the bottom side of the adjacent piece. The two edges will slip together, overlapping and creating a smooth transition. You can secure them with glue and/or by countersinking screws along the joint.
When the plywood subfloor has been dry fit and is ready to be permanently installed you’ll apply some Loctite PL 300 foam board adhesive to the XPS, put the plywood in place, and then add as many heavy objects as you can around the floor to help it adhere. This not only locks the floor together, but it prevents the foam board from being able to move around and squeak.
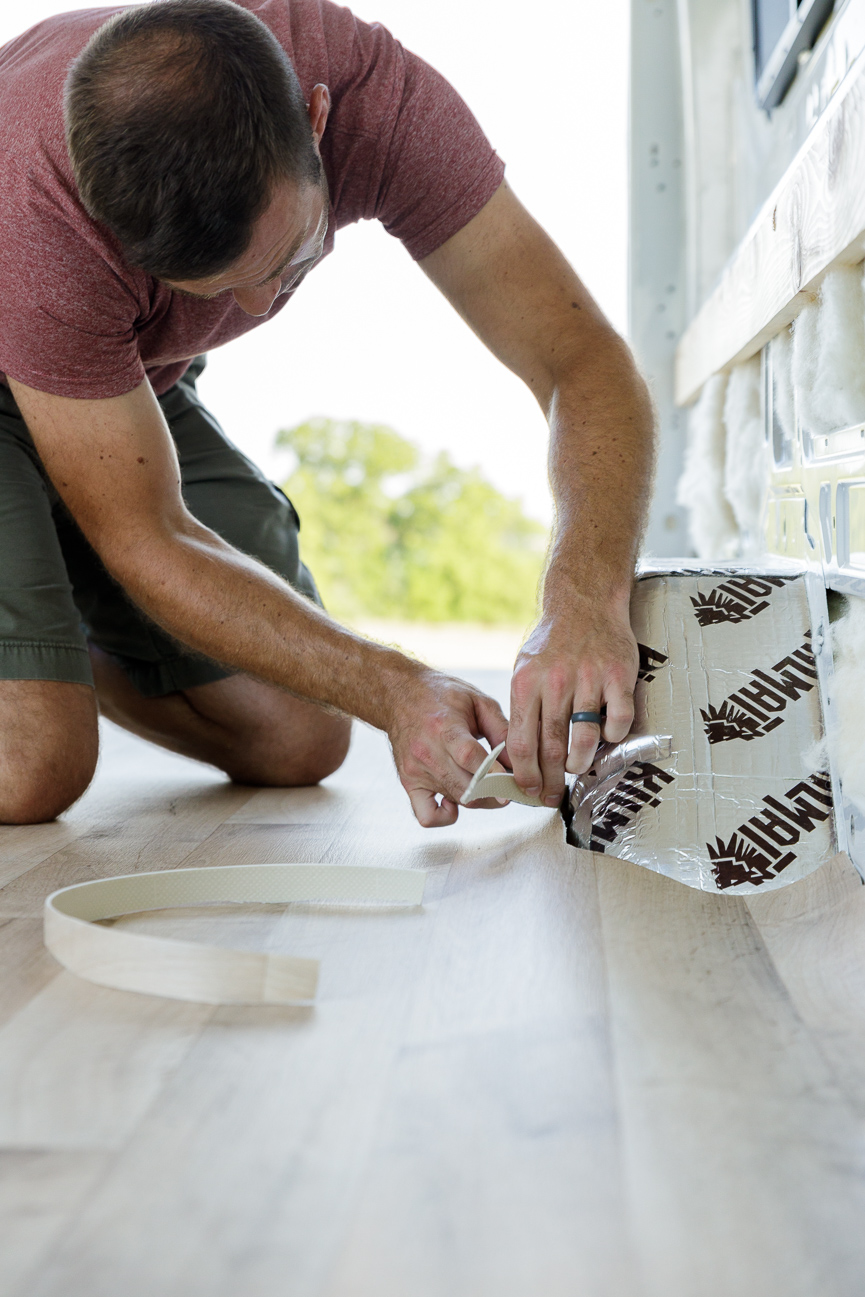
Spray foam around the perimeter
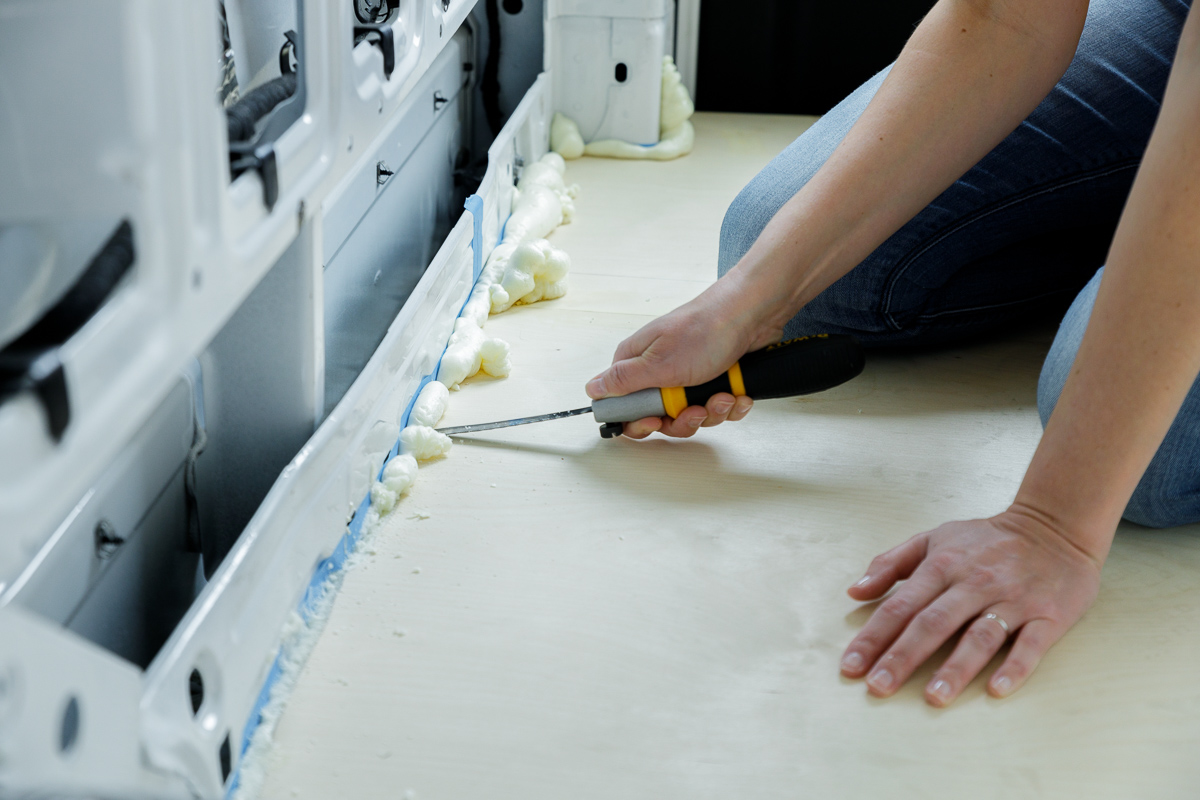
You may be wondering: what’s stopping the floor from moving around since it’s not secured to the van? That’s one reason we’ve left a gap around the entire perimeter. Using a can of expanding foam, such as Great Stuff Gaps & Cracks, fill that crack and give it plenty of time to cure. Later, come back to a razor or flexible blade and trim the foam flush with the subfloor.
Now the floor will be virtually locked in place. The subfloor in our van couldn’t have moved if it wanted to and from here you’re only going to add weight and secure things into the floors and walls, further locking everything together.
Special considerations
An important note here: don’t cover up anything you’ll need to access in the future. For example, in the Ford Transit near the rear doors, there’s a circular plug where you insert a tool to raise or lower the spare tire.
Take note of anything like this in your specific vehicle and, if necessary, measure and cut through your subfloor and insulation before permanently installing them.
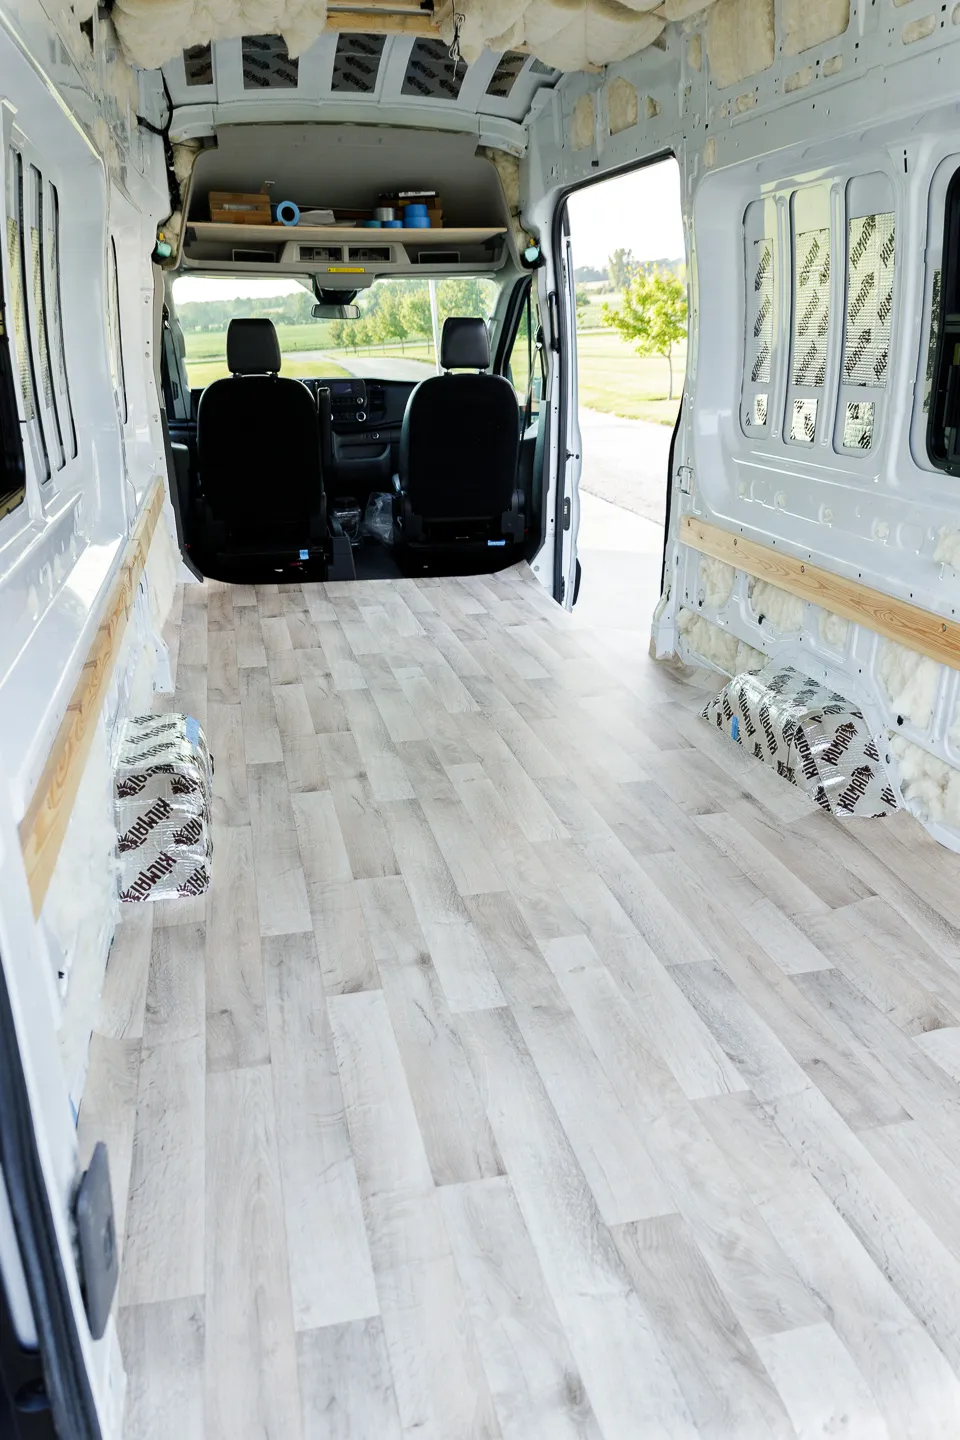
Finished Floor
To go to the edges or not? When finishing their floor, some opt to go edge to edge and then build the rest of the interior on top of that. Others choose to build out bed, cabinets, etc. and then finish the floor only in the area left between.
We’re in favor of finishing the entire floor and here’s our argument: A finished floor offers waterproof protection. If it only covers part of the subfloor, inevitable spills or leaks will be able to penetrate underneath, which could lead to moisture problems such as warping or mold.
Furthermore, a finished floor edge to edge means that just in case you ever decide to alter the layout or remove something you won’t be left with a bare floor underneath.
The only reason we can see to not go edge to edge is if you’re using a material that’s very expensive or heavy and you want to reduce cost or weight.
Speaking of which, let’s go over some of the material options for a finished floor.
The list includes sheet vinyl, luxury vinyl plank (LVP), cork, rubber, and linoleum. Some choices we would not recommend are solid wood, laminate flooring, foam, and (need we say it?) tile.
We put sheet vinyl first because it was our top choice. It’s inexpensive, durable, comes in a variety of looks, and is easy to install.
LVP is another decent option, since it’s waterproof and also easy to install. It can be relatively inexpensive, but will cost more than sheet vinyl, adds more weight and will eat away a bit more of your head room.
Cork is an interesting option, but it’s not cheap and does require some upkeep.
Linoleum is made from naturally waterproof materials, but can be double, or more, the cost of vinyl and require sealing. So, when comparing the two we would definitely choose vinyl.
Rubber may be an option for those seeking a practical, rugged finish. Rubber will hold up much better if you’re hauling around gear, such as mountain bikes. Depending on your layout, you may want to consider it in the ‘garage’ area of your build for its durability.
Solid wood flooring may be appealing for the look and because it can easily be found second hand and upcycled. It will require a decent amount of upkeep and skill during installation to ensure it doesn’t warp in the future. Just as importantly though, it will add unnecessary weight and bulk.
Laminate flooring, as opposed to LVP, is not waterproof and less durable, making it a poor choice. Foam, similarly, is too easily damaged and tile is just going to crack with the movement of your van and turn your feet into ice cubes.
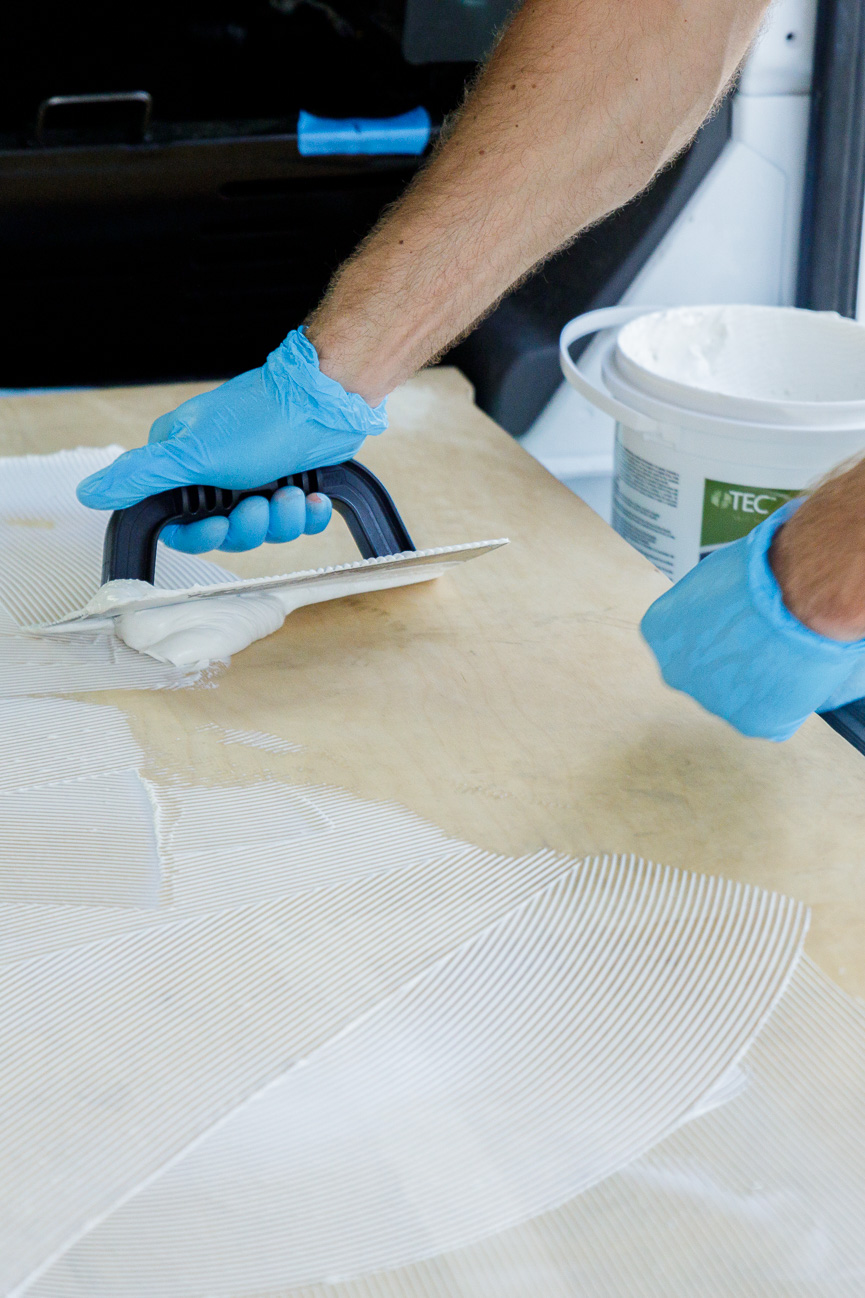
Installing sheet vinyl
Once you’ve settled on the look you want, decide which direction you want your sheet vinyl to run. We have a wood pattern on our flooring and we wanted the ‘planks’ to run front to back. That determined how much material we needed to purchase to lay it down in one solid sheet.
Again, your floor template proves its worth here. Lay it down over the vinyl and cut it to the right dimensions, leaving several inches around the perimeter this time. The only areas you want to cut away are the wheel wells and the entry step for the sliding door.
Now you can dry fit the vinyl over your subfloor, but you don’t want to trim all the edges until it’s been glued down.
Follow your sheet vinyl manufacturer’s instructions when choosing an adhesive and trowel.
Lay the vinyl down, making sure it’s positioned correctly and that the extra material is evenly distributed around the perimeter.
Then, roll up one half and, starting from the middle, apply the recommended amount of adhesive. Roll the vinyl back down, making any necessary final adjustments.
Get your abs ready for the next step. Using a rolling pin, smooth the vinyl from the middle out to the edges, removing any air bubbles. The vinyl will also stretch slightly here.
Repeat the process with the second half of the vinyl, then go around the perimeter and make your final trim with a sharp utility knife. Press down all the edges and roll them with a small roller or smooth everything with a plastic putty knife to ensure full adhesion. Give the adhesive the recommended amount of time to cure.
The last step to make your finished floor bullet proof is to go around the entire outside edge and apply a generous bead of silicone II caulk. This just guarantees that any moisture that does make it onto your floor in the future won’t be able to penetrate down to the wood subfloor or metal body of the van.
Final thoughts
Installing a good looking and durable finished floor in your campervan is a pretty easy and straightforward process. You just want to make sure you follow a few best practices so that everything will last a long time and provide a solid base for the rest of your build.
Now that the floor is properly insulated, the next step we’ll be covering is insulating the rest of the van to keep the inside comfortable no matter what the temperatures are outside.
Planning to build a campervan? Follow us on Pinterest for more how-to guides and inspiration.

Get your van build going with these posts


Some of the links found on our website are affiliate links.
As Amazon Associates we earn from qualifying purchases. We may also receive a small commission at no extra cost to you through other links. Using them is a way of supporting us, helping us offset the cost of running this website, and ensuring that we’re able to continue providing free content and resources.
That makes y’all totally awesome and we truly appreciate the support!
If you've found value in our guides, you can say thanks with a virtual coffee.


Lorem ipsum dolor sit amet, consectetur adipiscing elit. Suspendisse varius enim in eros elementum tristique. Duis cursus, mi quis viverra ornare, eros dolor interdum nulla, ut commodo diam libero vitae erat. Aenean faucibus nibh et justo cursus id rutrum lorem imperdiet. Nunc ut sem vitae risus tristique posuere. uis cursus, mi quis viverra ornare, eros dolor interdum nulla, ut commodo diam libero vitae erat. Aenean faucibus nibh et justo cursus id rutrum lorem imperdiet. Nunc ut sem vitae risus tristique posuere.
Delete