
Updated December 2024
This post may contain affiliate links. If you use them we earn a small commission at no extra cost to you.
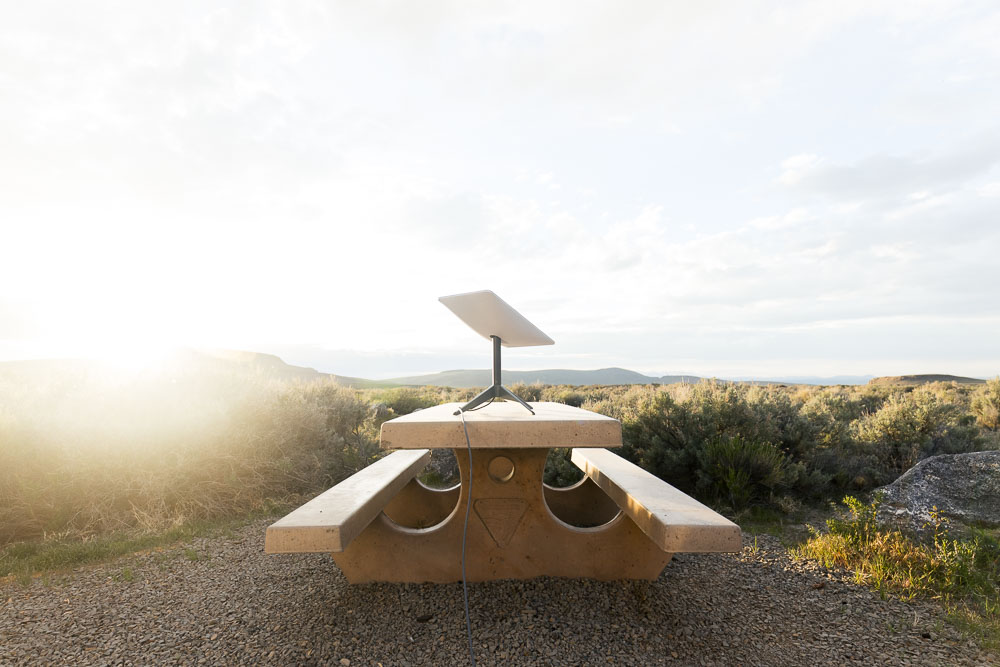
Starlink is revolutionizing the way digital nomads and travelers connect to the Internet and keeping folks like ourselves off-grid for longer. But one of the drawbacks is the amount of power the system consumes.
You may have considered purchasing Starlink, but hesitated because you're concerned it will drain your batteries.
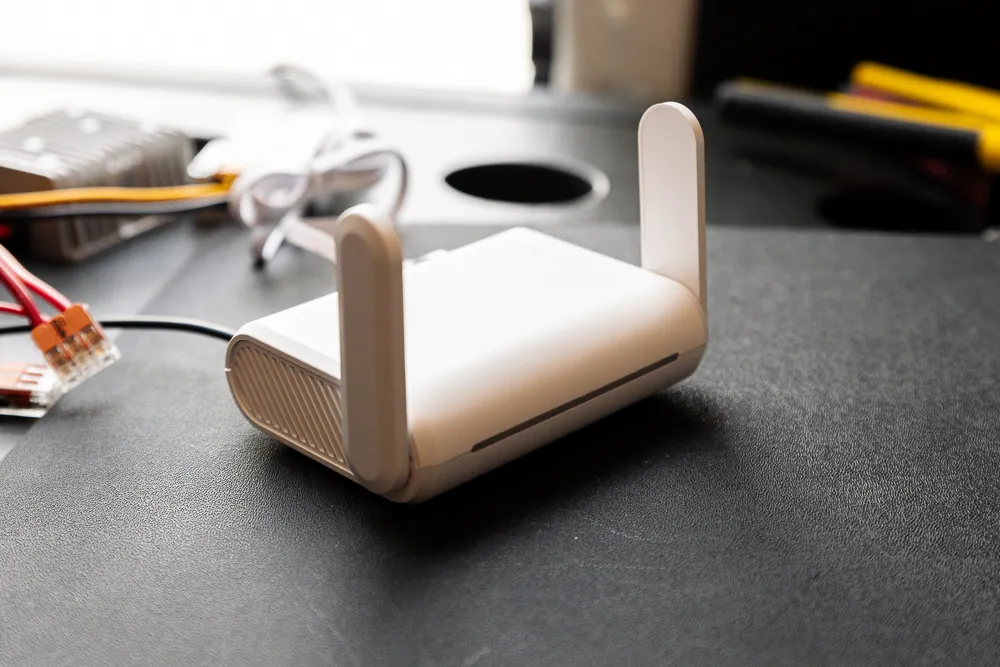
Like us, you might have limited space in your camper or RV and have struggled to decide where you'd store the Starlink 'Dishy' and its oddly shaped router.
When we purchased Starlink we did it with a plan to hardwire the system directly to our 12V battery bank.
We also ditched the standard router and purchased the smallest one that we could find. These two things saved us both precious power and space.
Good news: the process to complete this Starlink 12V conversion is straightforward and easy. This method is practically plug and play and doesn't require you to cut or modify the Starlink cable.
We're going to walk you through the process in a few easy steps, with some helpful diagrams to demonstrate how the components work together.
Gen 2 or Gen 3 dish?
Note that the full, detailed write up is specifically for the Gen 2 or "Standard Actuated" Dish. The principles remain the same for a "Standard" Gen 3 dish and you can jump down to the section on converting a Gen 3 dish to 12V by clicking here.
If you're trying to decide between the two, here are a few insights:
// First, the Gen 3 operates on 57V, while the Gen 2 uses 48V. The average power consumption of a Gen 3 is higher out of the box according to Starlink at 75 - 100 watts. A Gen 2 dish will use 50 - 75 watts. Both can be reduced with a 12V conversion, but the Gen 2 is significantly less power hungry.
// An advantage of the Gen 3 is its more compact design. The overall footprint of the dish is a few inches larger, but it's much thinner (1.5" versus 13.5"). It's also easier to flat mount a Gen 3 dish on the exterior of a vehicle, since there are non-DIY options on the market. If you want to flat mount a Gen 2 (we did!) you'll need to cut into the dish.
// Gen 2 dishes automatically positions themselves to find the best signal. While it has a simpler design, you may need to manually adjust a Gen 3 dish for best results.
// The Gen 3 router is an improvement over the Gen 2, but in this conversion we're going to eliminate the stock router anyway and replace it with a better and smaller one. You may be satisfied with the Gen 3 router, in which case you could make the conversion simpler and keep it.
// Starlink has discontinued direct sales of the Gen 2, so if you're going to buy new through them, you'll have to get the Gen 3, which is currently $350. You could likely find a much cheaper used Gen 2 for sale and would need to setup a new account and then activate it.
Understanding Starlink Power Requirements
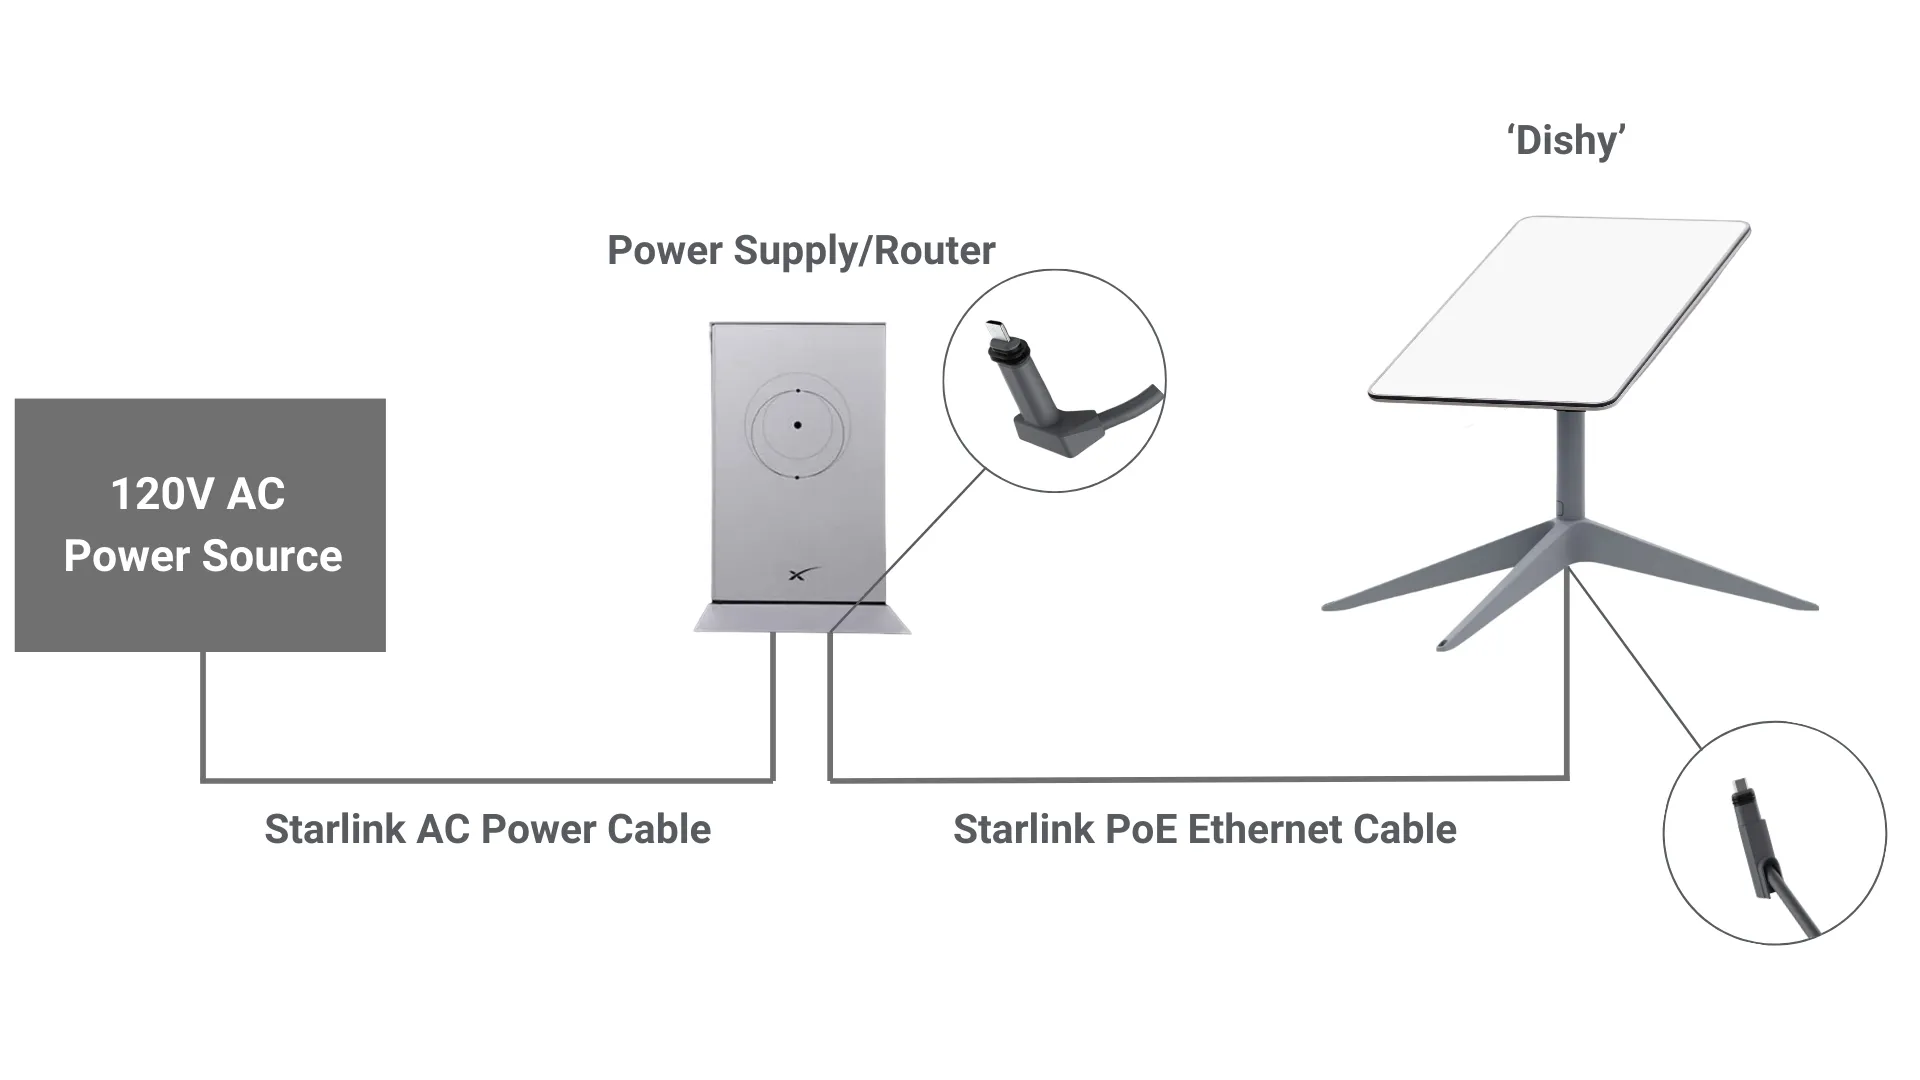
Before we begin the conversion, let's look at a quick overview of how Starlink works and its standard power requirements. Starlink has two basic components: the satellite dish, affectionately known as 'Dishy', and the power supply/router.
Starlink Satellite Dish
The 'Dishy' contains the modem, meaning that when you connect to the system via the Starlink app on your phone, this is actually what you're connecting to.
As you can see in the diagram below, the 'Dishy' connects to the router via an ethernet cable, which has two proprietary connectors. This cable uses something called 'power over ethernet' or PoE.
The PoE cable is not only a line of communication between the dish and the router, it's also supplying the necessary 48V power for the dish.
Power Supply and Router
That oddly shaped, almost impossible to conveniently mount somewhere box is serving two purposes.
It takes standard household 120V AC power, converts it down to 48V and sends it through the PoE cable to power the 'Dishy'. Secondly, it's a WiFi router, sending the signal out so that other devices can connect to the Internet.
In a typical camper or RV situation, you would need an inverter to take 12 volts from your battery bank and give you 120 volts to feed the Starlink power supply. In this step alone we can lose 10% or more of that power, since inverters are not perfectly efficient. That would then be converted back down to 48 volts and used to power the 'Dishy'.
From this overview we can see the inefficiency of using the standard setup in a mobile environment.
In addition, the Starlink power supply has no built in on-off switch, so to conserve as much power as possible you would need to unplug it every time you're done using the internet, or turn off your entire inverter.
Want a Free Month of Starlink?
If you haven't already signed up for Starlink and want one month of free service (that's $165!), use our referral link. We also get a free month so, for that, we say: thank you, you're awesome!
Converting to 12V: Step-by-Step Guide
The goal of the conversion is to eliminate the Starlink power supply/router, hardwire the system directly into a 12V power supply to maximize efficiency, and incorporate a simple on-off switch so the system can be easily powered down when not in use.
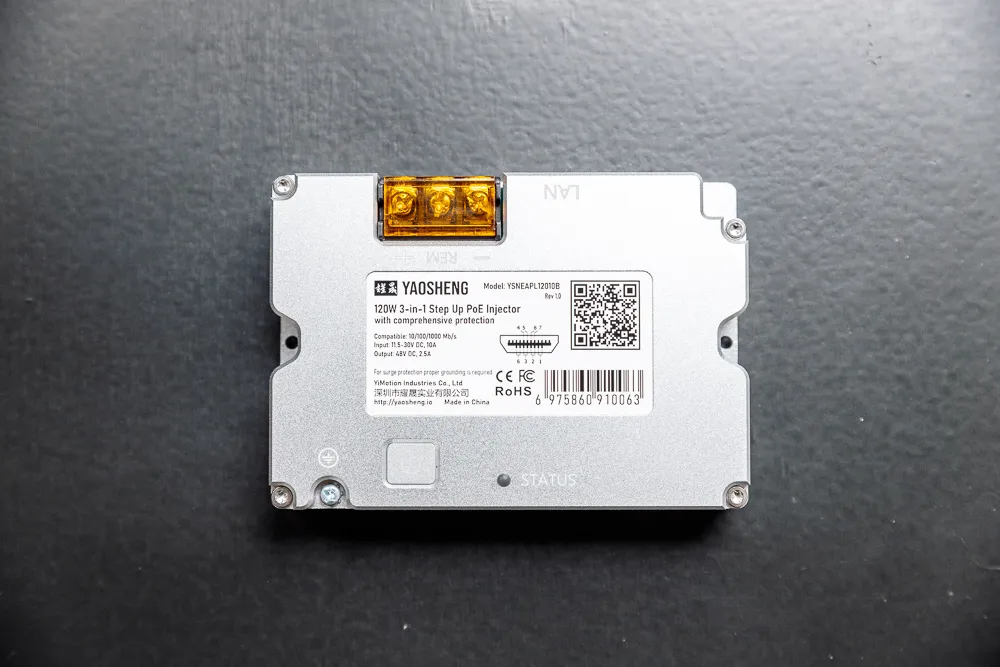
Prior to March of 2024, you needed to purchase multiple components in order to accomplish this. But we now have two options, since Yaosheng has released its 3-in-1 step up PoE injector.
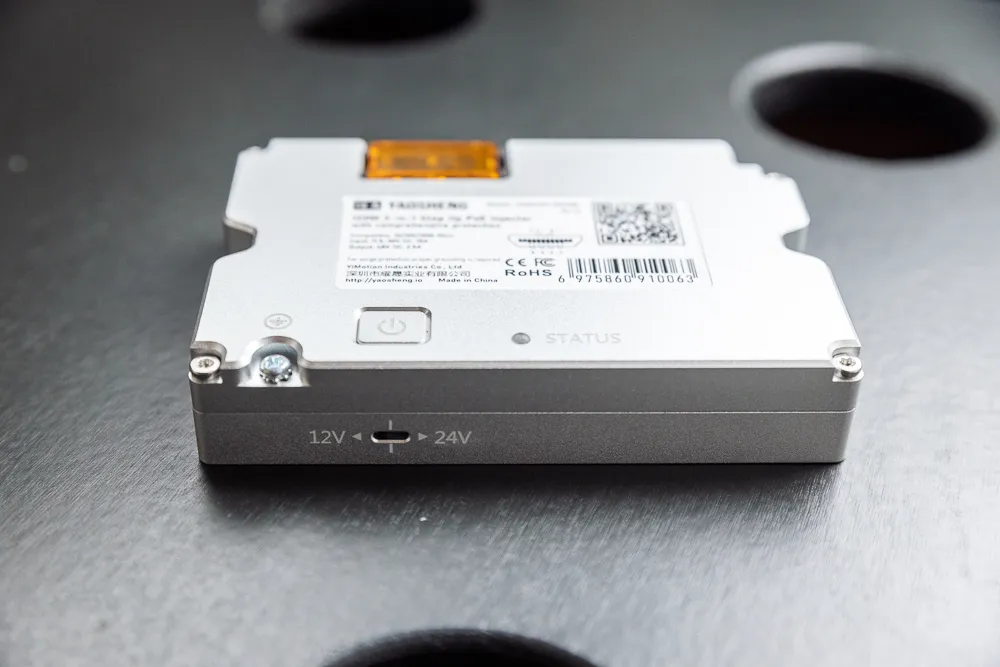
With three of the necessary components combined into one, the conversion is simpler than ever and, as a bonus, it allows you to choose between 12V or 24V, depending on your system.
There is, however, at least one reason why you might choose not to complete the conversion using this new option, so we're going to describe both methods below and discuss the benefits of each.
Step 1: Choose a conversion method and buy the necessary components
Shopping List for the 3-in-1 Conversion
- 3-in-1 Step Up PoE Injector
- Mini router
- 12V to USB C converter
- Switch (optional)
- Wire, connectors, and a fuse
To make it easier, we've put all these items into one list on our Amazon storefront.
Let's go over each of these components in a little more detail. Below, you'll find diagrams showing how all of these are going to be connected together.
3-in-1 Step Up PoE Injector | The three components being combined here are the 48V converter, the PoE injector, and the RJ45 adapter. There's a switch on the side to select between 12V or 24V input, so no matter which type of system you have it will step the voltage up to the 48 volts needed and push it through the PoE port to power Starlink.
It also eliminates the need for an RJ45 adapter, since the proprietary Starlink cable can plug in directly.
As a bonus, Yaosheng has included an integrated power switch on this model. So, if it's installed in an accessible location you can power it off and on directly. But, it's also possible to add a switch into the system if you need to locate it in a more convenient spot.
Mini Router | You can use any router you wish for this setup. We recommend this GL.iNet travel router because of its extremely compact size and ease of use.
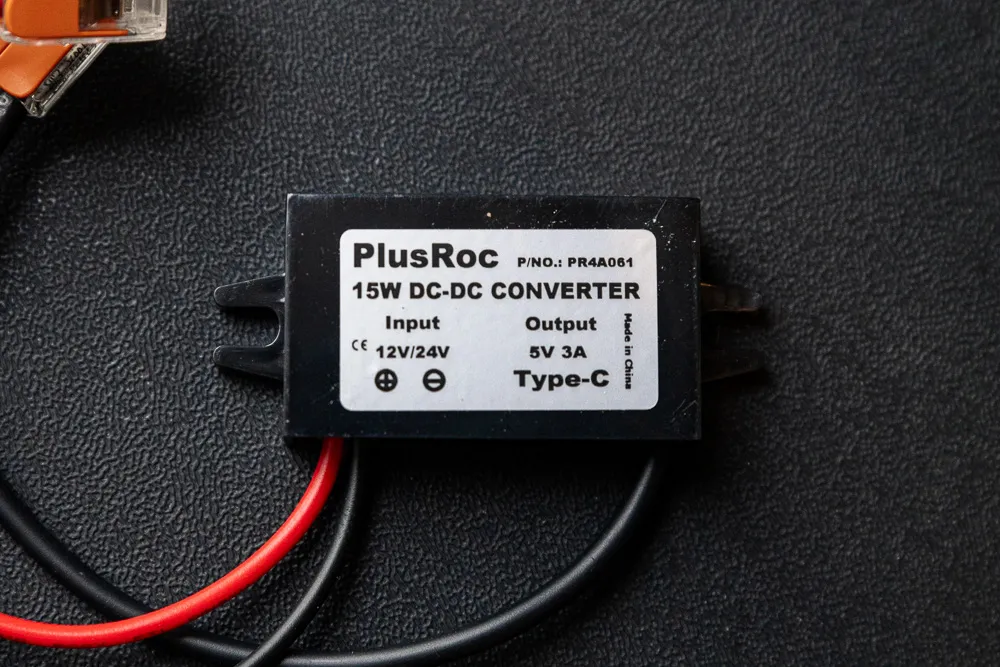
12V to USB C Converter | Our mini router is powered by 12V, but has a USB C plug, so to hardwire it into our system we're going to use this converter.
Wire, Connectors, and a Fuse | You'll need a few other miscellaneous components, including appropriately sized wire, some connectors, and a fuse.
When using the 'snowmelt' feature, Starlink can draw up to 12 amps on 12V, so we're using a 15A fuse.
You should size your wires appropriately given your own situation and, if you're not sure how, Blue Sea has an excellent guide and reference chart.
The best wire for a campervan or RV application is stranded marine grade from a supplier like Ancor.
We personally recommend WAGO lever nuts for connecting wires. They're extremely simple and you don't need any special tools to use them. We used them all throughout our own van build and have yet to experience any problems with them.
If you're installing a switch in your system you'll need some female spade connectors and we highly recommend the marine grade heat shrink variety.
Shopping List for the Separate Components Conversion
- 12V to 48V converter
- PoE injector
- RJ45 adapter
- Mini router
- 12V to USB C converter
- Switch (optional)
- Wire, connectors, and a fuse
To make it easier, we've put all these items into one list on our Amazon storefront.
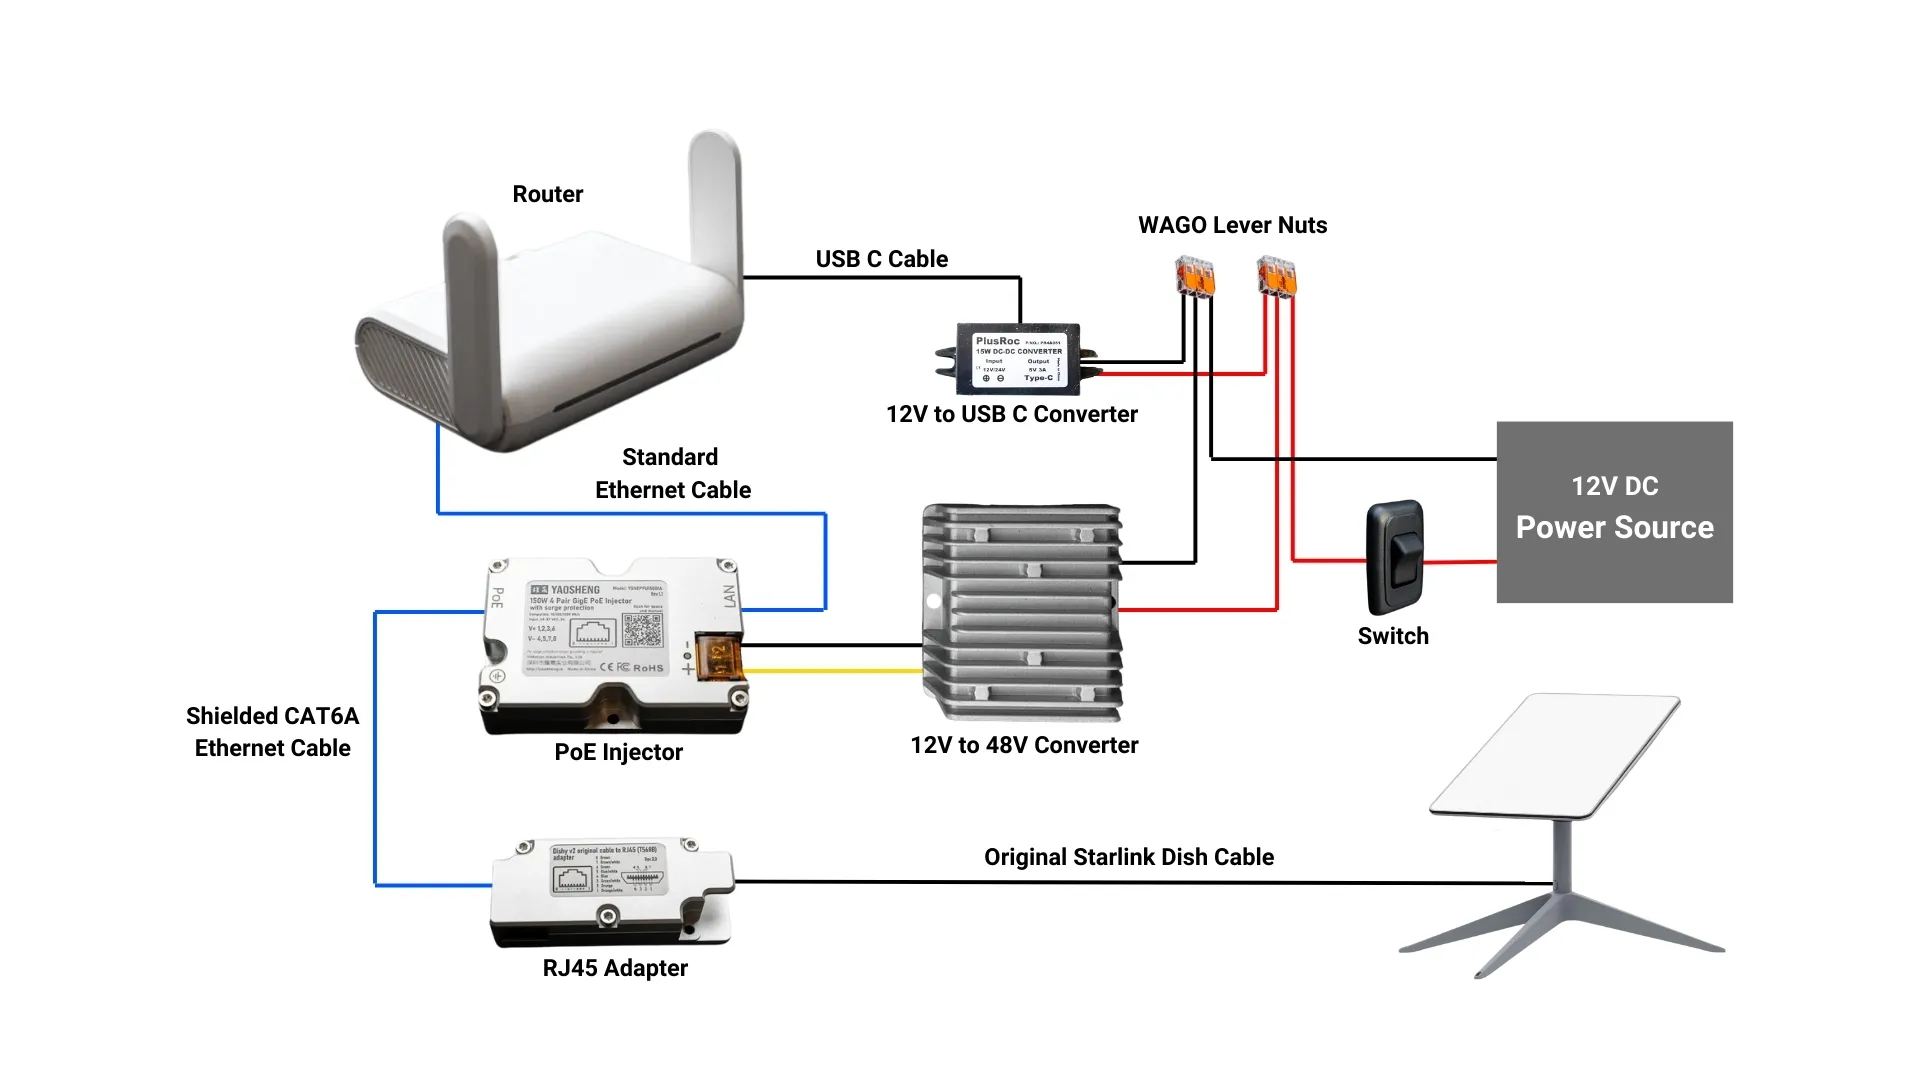
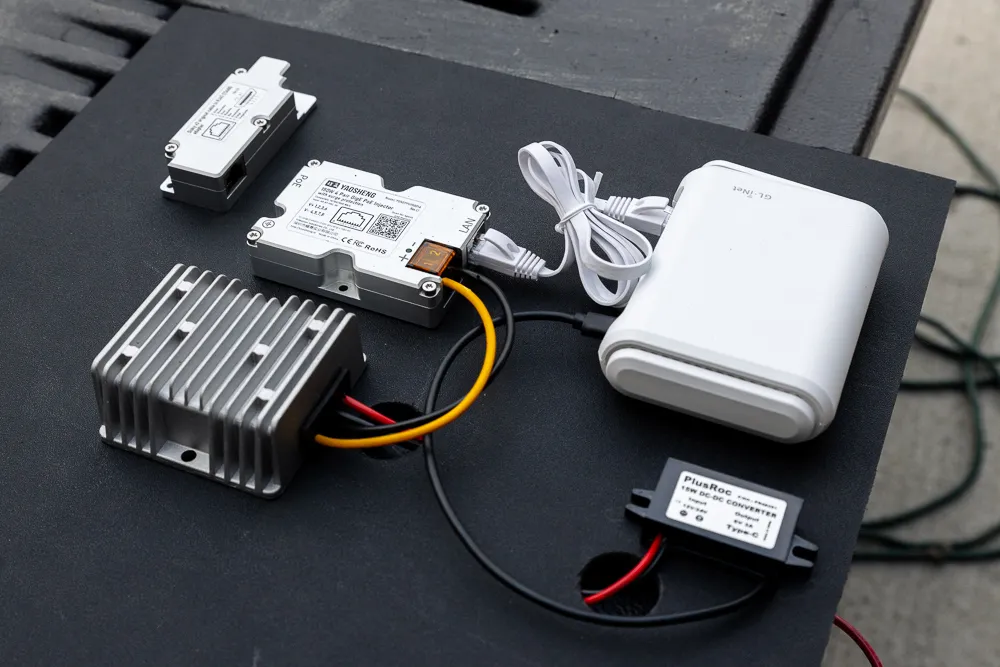
Instead of using the 3-in-1 injector, in this method you wire together multiple components, so we'll discuss the purpose of each of those.
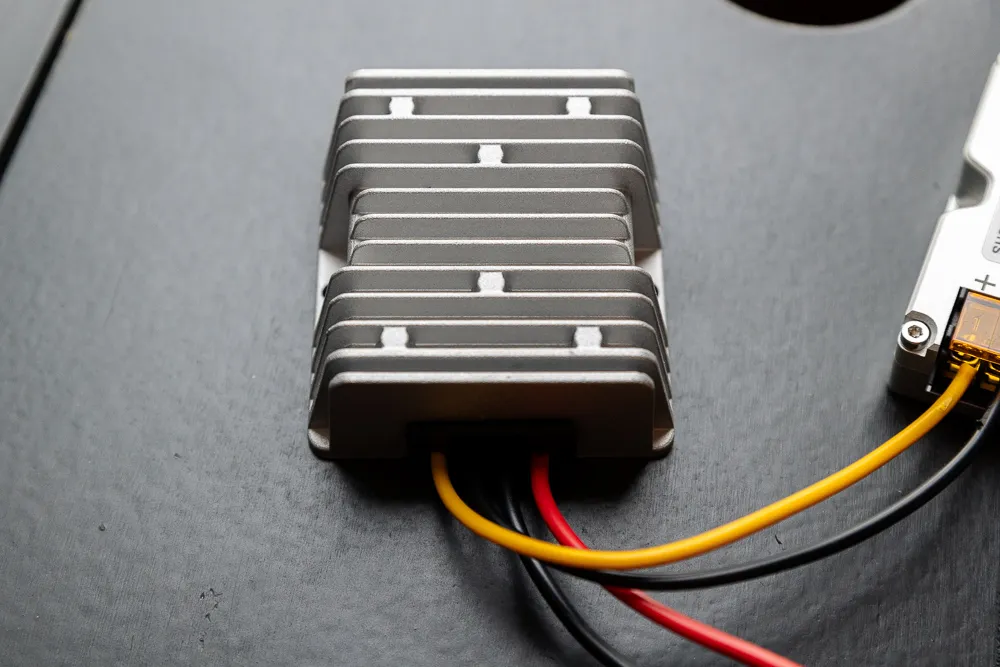
12V to 48V Converter | This converter is simply doing the work of taking 12 volts directly from your power supply and turning it into the 48 volts necessary to power the 'Dishy'.
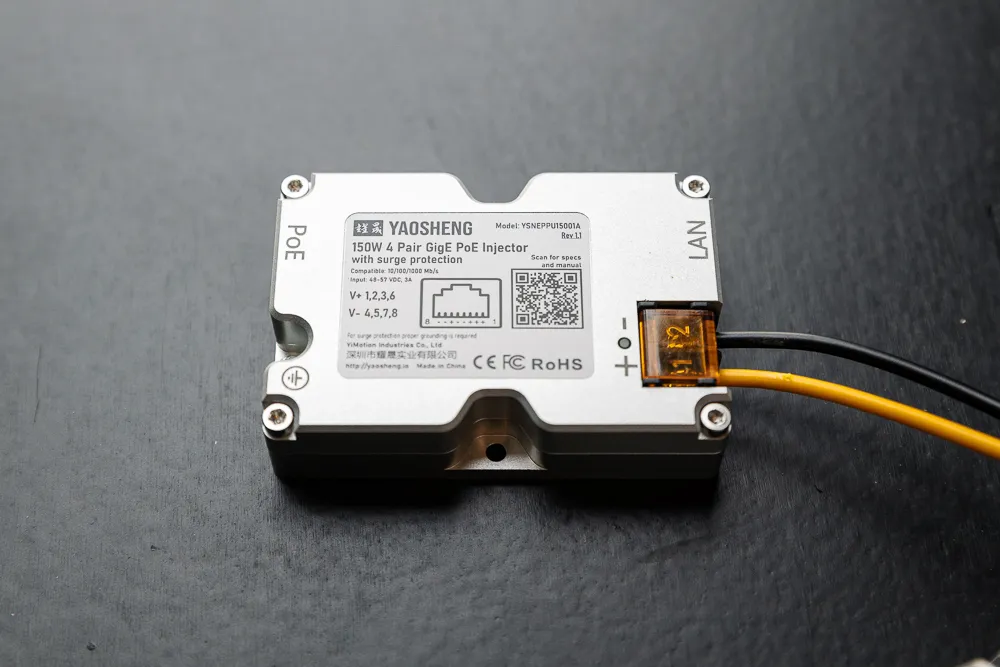
PoE Injector | The PoE injector is the real champ here, taking the 48V power and sending it down that proprietary Starlink cable to the 'Dishy'. That means no need to cut the original cable.
It will be connected to the 12V to 48V converter by two of the wires, which are held in place with screw terminals. The other side connects to the next component, the RJ45 adapter, with a shielded CAT6A ethernet cable.
RJ45 Adapter | All this adapter does is create a connection between the PoE injector and the proprietary Starlink cable, allowing power to pass to the 'Dishy'.

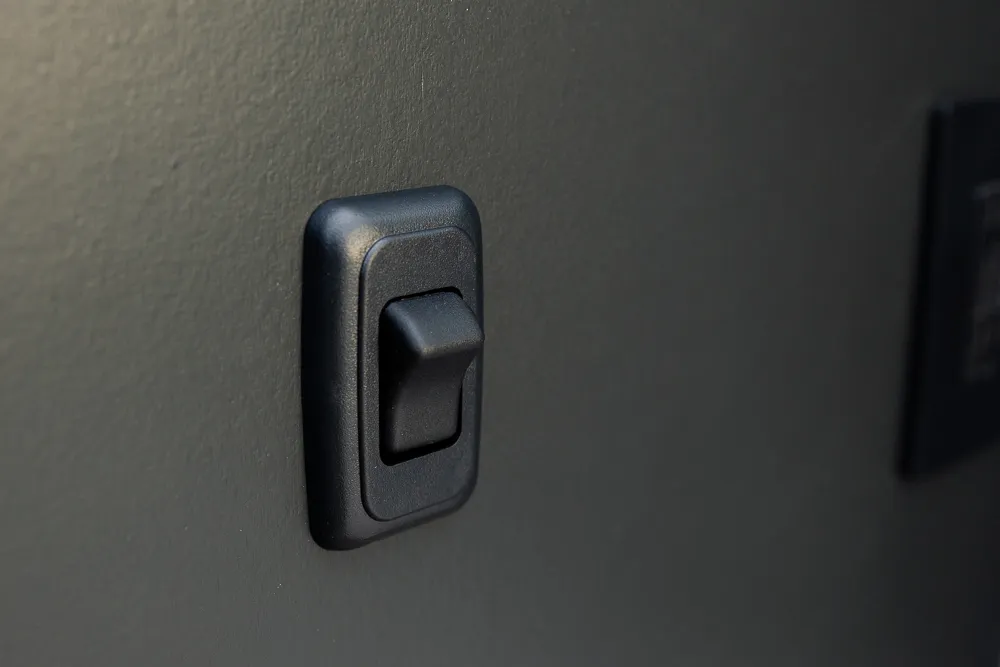
12V Switch | This is an optional step, but why wouldn't you want to be able to turn the system off and on at the throw of a switch? We recommend this one, which comes in black, white and tan.
3-in-1 Conversion Diagram
The 3-in-1 injector makes installation very straightforward. You'll need to connect it to a 12V or 24V power source, wire your router for power, and plug in the Starlink Dishy cable.

Separate Components Diagram
The separate components approach has a little more going on, but it's still quite simple and mostly plug and play. You just need to wire in the 12V to 48V converter and make sure your PoE injector and RJ45 adapter are connected with the included CAT6A Ethernet cable. You'll also want to wire a switch into the system, since there's no other way to turn it off and on.
Comparing The Two Conversion Options
From the two diagrams, you can see that the 3-in-1 approach requires fewer components and wires, and saves space.
As of early 2024 the price was slightly lower when purchasing the separate components. $12.06 to be precise. So they're very close in terms of cost.
But, the main consideration between these two options, which we hinted at above, comes from the separation of the adapter and PoE injector.
Now, this will vary widely based on your use case, but we're personally running Starlink in our campervan. For us, it was important to figure out how we would connect the Dishy cable to the rest of the system.
Lots of folks seem to just run the cable through an open window. There's even a window seal designed for that now.
Others have come up with inventive ways to add a plug on the exterior of the vehicle, but all the ones we've seen require cutting the original Starlink cable.
We decided to run the Ethernet cable between the PoE injector and adapter through the floor. Our adapter is actually stored underneath our van, in a waterproof container, allowing us to pull it out and plug in the Dishy whenever we need it.
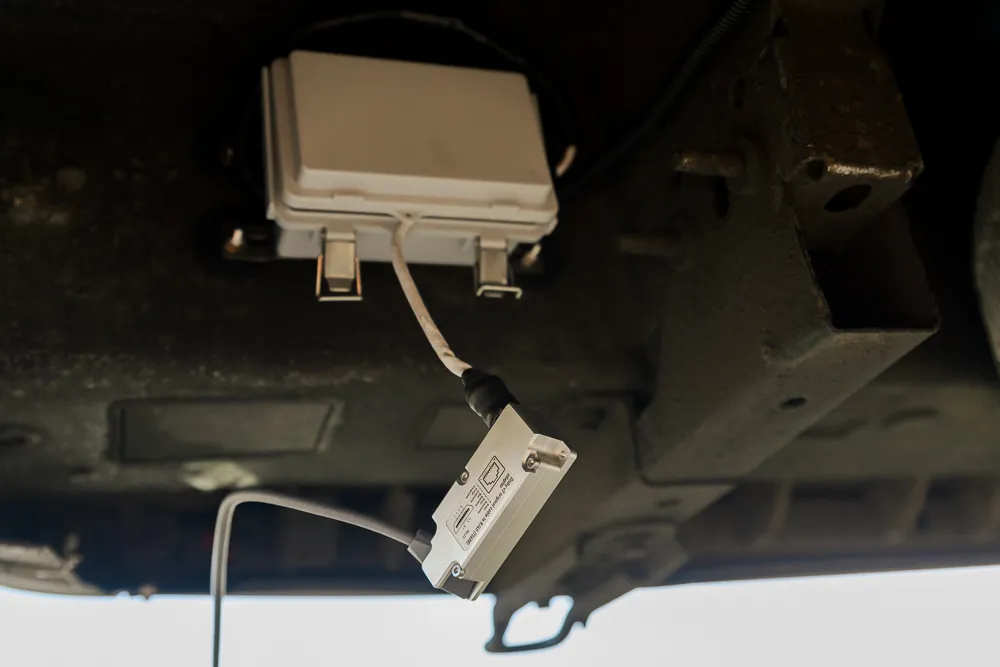
It's not the most elegant solution, but it's been working for us. And, because of that, we would probably still choose to keep those components separate in our conversion.
If you find a different method, or you're fine with passing the cable through a window and plugging it in to your injector, then perhaps the 3-in-1 option is best for you.
Step 2: Mounting everything together to save space
All of the above components, when wired together, won't take up more than about 1 square foot. You've got plenty of options on how you can mount everything.
The route we chose was to buy a thin HDPE panel, mount everything as close as possible, and then install the panel inside our electrical cabinet. We mounted it vertically and it took up minimal space and weighs next to nothing.
Most of the components have holes for mounting them with screws, but we also used some extra strength double sided tape for more security, since the panel is so thin.
Play around with your layout a bit, being sure to visualize how all the components connect together and where your wires will run. The diagram above reflects how we chose to lay things out.
Step 3: Wiring the components together
DISCLAIMER: Though we've done this installation ourselves, we're not professional electricians. If you choose to follow our instructions, do so at your own risk. If you're not completely comfortable with DIY electrical work, please consult a professional.
Once you know where your setup is going and have it laid out, it's time to start connecting everything.
For the 3-in-1 Conversion
Cut and strip the input wires on your 12V to USB C converter and attach a 3-port WAGO lever nut to each of them.
Plug the other end of the 12V to USB C converter into the USB power port on your mini router.
Cut and strip both ends of two wires, a positive and a negative. Insert them under the corresponding screw terminals on the 3-in-1 injector. The little orange cover plate lifts up to access them more easily.
Matching positive to positive and negative to negative, insert the ends into the lever nuts connected to your USB C converter.
Plug your mini router into the 3-in-1 injector with a standard Ethernet cable.
Cut and strip two more wires. Insert them into the corresponding lever nuts and run the other ends back to your 12V power source, typically a positive and negative bus bar.
The 3-in-1 injector has an optional grounding screw, if your electrical system isn't otherwise grounded.
For the Separate Components Conversion
Cut and strip the output wires on your 12V to 48V converter, then insert them under the corresponding screw terminals on the PoE injector. The little orange cover plate lifts up to access them more easily.
Pay close attention that you're matching the positive to positive and negative to negative. They're both marked on each component.
Cut and strip the input wires on your 12V to 48V converter and attach a 3-port WAGO lever nut to each of them.
Cut and strip the input wires on your 12V to USB C converter. Insert them into the lever nuts that you just connected to the other converter.
Plug the other end of the 12V to USB C converter into the USB power port on your mini router.
Plug a standard ethernet cable into the WAN port on your mini router and the LAN port on the PoE injector.
Plug the included ethernet cable for the RJ45 adapter into the PoE port on the injector and the other end into the adapter. It's important that you use the included cable or another shielded CAT6A cable with a T-568B pinout. Using a different cable could damage your system.
You're finished wiring the components together, so just determine where you're going to place your on-off switch.
Connect that to the system by cutting, stripping, and crimping female spade connectors onto two pieces of positive wire. Push the spade connectors onto the male ends on the switch and run one wire back to your positive lever nut where your converters are connected.
The other positive wire from the switch goes back to your 12V power source, usually your positive bus bar.
Lastly, cut and strip a piece of negative wire, connect it to your remaining lever nut and the negative side of your bus bar.
To make our install as clean as possible, we drilled holes in the HDPE panel, making sure to clean up and sand the rough edges, then ran our positive and negative wires through them. We made the lever nut connections on the back side of the panel.
Step 4: Testing the new 12V power setup
Double check your wire connections and then power up your system. An absence of smoke or sparks, along with a glowing green light on the PoE injector and a light on your mini router means you did everything correctly.
Step 5: Connecting to the Starlink dish
You can now set up and plug in your Starlink dish.
If this is the first time you've ever turned on Starlink, you need to power it up using the original power supply/router.
Follow all the prompts in the app to set it up until you're completely connected. You do not need to change any settings in the app specifically for your new Starlink 12V system or replacement router.
Once your service is set up and running, you can plug the Starlink cable directly into the RJ45 adapter.
Look for your new mini router's WiFi signal and connect to that.
That's all there is to it. You should now be connected to your Starlink service through the mini router.
If there doesn't seem to be any signal at first or it appears to be dropping off, give it some time. We found that if we waited a few minutes after powering up the system the connection was more stable and worked just fine.
Power Consumption and Efficiency
What's the point in powering your Starlink on 12V if you're not saving power? As promised, we've updated this post after a full year of using our Starlink while out boondocking and measuring power consumption under real life conditions.
Others have gone to great length to measure and compare Starlink on 120V versus 12V, with their test results sometimes coming in across the board.
In general, Starlink has been shown to use around 60 - 100 watts on 120V. Starlink's website claims that it's 50 - 75 watts. Measurements on 12V have been between 30 and 84 watts.
We're happy to say that in our own tests we've seen an average of 30 - 40 watts on 12V, with an initial max of 57 watts on start up. That includes the power consumption of our mini router and all the components in our conversion. We measured it over a one hour period with all other loads in our system shut off.
The Starlink app also received an update and now shows power consumption right on screen. For us that averages 32 watts, up to 45 watts with the snowmelt feature on.
Converting Starlink to run on 12V is clearly a great way to save precious battery power!
Common Questions About The Starlink 12V DC Conversion
How efficient is it to run Starlink on DC power?
After one full year of using our Starlink, we've seen that a 12V conversion can save as much as 40 - 60% in power. See 'Power Consumption and Efficiency' above for more details.
Does this conversion work with the Gen 3 Dish?
The components in this conversion aren't compatible with the Gen 3 or "Standard" dish and are meant for the Gen 2 or "Standard Actuated" dish.
The good news is that converting a Gen 3 dish is even simpler. It works with a different voltage (57V instead of 48V) which means that while you can still reduce some inefficiency, the power savings will be less than with a Gen 2.
A Gen 3 dish averages 75 - 100 watts on 120V. That can be reduced down to about 60 watts with a conversion, so you should expect to see 10 - 20% savings. When you're operating off solar and battery power every little bit helps though.
If you'd like to keep the original Starlink Gen 3 router, all you need to do is buy a 12V - 57V converter and wire it to your power source, then plug it into the router.
If you want to upgrade to a mini router, then use the Yaosheng 220W PoE Injector for Gen 3. Combined with a PoE splitter you can save power and choose any router you want.
In full disclosure, we haven't personally used the above products, since we're happy with our Gen 2 setup for now. For that reason we won't do a full step by step write up on the conversion, but the process is almost exactly the same as above. If you're a confident DIYer you can easily do it using the diagrams Yaosheng provides.
Can I still use the Starlink app after a 12V conversion?
Yes. The Starlink dish contains the modem and firmware for connecting to the system. So, by eliminating the stock Starlink router, you are still able to connect via the app just as you would normally.
Do I need to cut or modify the Starlink dish cable for a 12V conversion?
No. With the components made by Yaosheng, there's no need to cut or modify your original Starlink cable. Everything is practically plug and play. That being said, you can modify the cable if you wish to shorten it or if you'd like to wire an exterior port for the dish.
Will the 12V conversion void my Starlink warranty?
There are two sections of the Starlink Terms of Service that might address this:
Under 3.1 - Kit Install Guidelines it says "At Starlink’s sole discretion, if we determine that your installation or modification of a Starlink Kit has resulted in a material degradation of the Service or equipment, the equipment Limited Warranty may be voided."
Under 8.5 - Modifications to Starlink Products & Export Controls it says "At its sole discretion, Starlink may refuse to provide technical support to any modified Starlink products and is grounds for termination of this Agreement."
Since this conversion requires no cable cutting or modifying of the dish, we believe there's a low risk of voiding your warranty. However, keep in mind that the wording leaves it up to Starlink's "sole discretion."
Planning to convert Starlink to 12V? Save this guide for later!

Converting a van? Get started with our guides:


Some of the links found on our website are affiliate links.
As Amazon Associates we earn from qualifying purchases. We may also receive a small commission at no extra cost to you through other links. Using them is a way of supporting us, helping us offset the cost of running this website, and ensuring that we’re able to continue providing free content and resources.
That makes y’all totally awesome and we truly appreciate the support!
If you've found value in our guides, you can say thanks with a virtual coffee.


Lorem ipsum dolor sit amet, consectetur adipiscing elit. Suspendisse varius enim in eros elementum tristique. Duis cursus, mi quis viverra ornare, eros dolor interdum nulla, ut commodo diam libero vitae erat. Aenean faucibus nibh et justo cursus id rutrum lorem imperdiet. Nunc ut sem vitae risus tristique posuere. uis cursus, mi quis viverra ornare, eros dolor interdum nulla, ut commodo diam libero vitae erat. Aenean faucibus nibh et justo cursus id rutrum lorem imperdiet. Nunc ut sem vitae risus tristique posuere.
Delete